Complete this procedure if you selected a Batch Type of Journal on the Standing Journal screen. Journal batches are used to enter manual debit and credit postings directly into the General Ledger. Examples of journal transactions include depreciation expense journals, journal adjustments to fix incorrect postings, and other miscellaneous journal entries.
To enter journal transactions:
Refer to "Creating a New Standing Journal Template" or "Recalling a Standing Journal Template".
Micronet displays the Standing Journal screen.
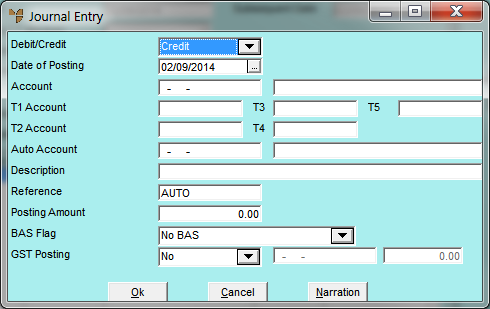
If you selected to add, insert or edit a journal, Micronet displays the Journal Entry screen.
|
|
Field |
Value |
|
|
Debit/Credit |
Select Debit or Credit for this transaction. The default is Debit. |
|
|
Date of Posting |
Enter the transaction date. This defaults to the computer's system date but you can change it by selecting a different date or by entering a date in DDMMYY format. |
|
|

|
Warning Regardless of the date entered, Micronet posts the transaction to the period selected on the GL Transactions screen. |
|
|

|
Technical Tip When entering many transactions for a date that is not the same as the computer's system date, you can set the date manually - refer to "Maintenance - Change Local Date (Set Local Date)". |
|
|
Account |
Select the account to post the journal transaction to. |
|
T1, T2, T3, T4, T5 Account |
If T accounts are enabled in your system, select a T1, T2, T3, T4 and/or T5 account to be associated with the debit journal posting (T accounts are not compulsory for credit journal postings). If you enter an incorrect account, Micronet displays a list of all available T accounts. |
|
|
|
Technical Tip If T accounts are enabled, you must select them when posting the debit side of journal transactions. If you don't select a T account, Micronet prompts you to enter one. |
|
|
Auto Account |
If the account has an auto account enabled in the GL account master file, it is automatically displayed here as the other side of the journal. |
|
|
Description |
Enter a meaningful description of the journal transaction. This description displays on account inquiries. |
|
Reference |
Enter the journal reference number, or leave as AUTO for the next automatic audit number. The reference for journal transactions is usually the journal folio number. |
|
|
Posting Amount |
Enter the amount of the journal transaction. |
|
|
BAS Flag |
Micronet displays the BAS flag entered against the selected journal account. However, you can change this if required to process the transaction with an alternative BAS section, e.g. to G14- No GST. |
|
|
GST Posting |
Select whether GST is applicable to the journal amount. Options are:
If you are processing a debit journal, this amount can be posted to your nominated Debit Journal GST account. If you are processing a credit journal, this amount can be posted to your nominated Credit Journal GST account. Both of these accounts are defined in your company configuration (refer to "Edit - Applications - MGL - Special Accounts"). Otherwise, select the correct GST GL Account based on the nature of the transaction. |
|
|
[GST Posting Account] |
Depending on your selection in the previous field, Micronet displays the GST Input Credit account or GST Collected account, or you can select the appropriate GST account. |
|
|
[GST Posting Amount] |
The GST Posting amount is calculated as 1/11 of the total posting amount. If the GST Posting amount is not 1/11, override the GST amount to the correct amount for the transaction. |
Refer to "Journal Entry - Narration".
If you selected to add a journal, Micronet redisplays the Journal Entry screen so you can add further journals.
Micronet redisplays the Standing Journal screen showing all the journals added.
Refer to "Managing Completed Standing Journal Templates".